Debugging and Fixing the Android Emulator Hypervisor Issue

If you're here for a quick solution, feel free to skip to Part 2. If you're interested in the debugging process I went through, keep reading!
Issue and Debugging Process
When trying to play a virtual device, I encoutered error "The emulator process for AVD xxx has terminated".
To begin, I checked the Android Studio log to see what might be causing the issue. To locate the log, navigate to Android Studio > Help > Show Log in Explorer.
In my case, the log file was located at:
Users\<userName>\AppData\Local\Google\AndroidStudio2024.2\log
I searched for the most recent error messages by looking for the keyword "failed" and identified the first failures based on the log's timeline. The only error message that stood out was:
"WARN - Emulator: Pixel 4 XL API 33 - Failed to process .ini".
Since there wasn't much information about this error online, I decided to update all the SDK plugins. Unfortunately, this didn't solve the problem.
Despite the fact that all requirements appeared to be fine in the log, I cleared up some disk space to ensure there was enough room and then reinstalled the app. During the installation process, I kept an eye on the logs to see if anything stood out. Near the end of the installation, I noticed two important lines in the log:
Running Android Emulator hypervisor driver installer
[SC] ControlService FAILED 1062:

The service has not been started.
At this point, I realized that the hypervisor driver had not been installed properly.
Next, I went to c:\users\<userName>\AppData\Local\Android\Sdk\emulator and tried running the virtual device from the command line using the following command:
emulator -avd "avd_name" -accel auto
To find list of devices, use this command:
emulator -list-avds
Running the command this way made it easier to see the log messages. The error message that appeared confirmed my suspicion.
Finding Solution
After a tons of research and trying different things, I found that enabling Virtual Machine Platform and Windows Hypervisor Platform in Control Panel > Programs > Turn Windows features on or off solves the issue!
Steps to Solve the Issue
To sum up, here are the steps I tried to resolve the issue:
Ensure Your Machine Has Enough Space
Make sure your computer has enough free space on the disk. A lack of space can sometimes interfere with emulator installation or operation.
Update All Installed Tools
- In Android Studio, go to
Tools > SDK Manager > SDK Tools - Any tools with a blue checkmark are already installed. If an update is available, check the box and click Apply to start the update.
- Ensure that Android Emulator is installed and up-to-date.
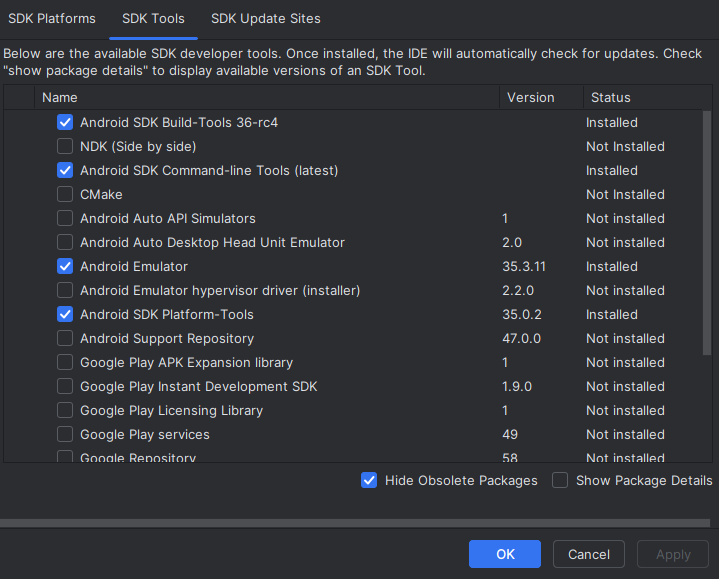
Here's what my final SDK tools look like:
Reinstall Android Studio
- Uninstall Android Studio.
- Delete the folder located at:
C:\Program Files\Android\Android Studio - Reinstall
Enable hypervisor in Windows (worked for me!)
-
Uninstall Android Studio (step 1 & 2 above)
-
Open
Control Panel > Programs > Turn Windows features on or off, then check both Virtual Machine Platform and Windows Hypervisor Platform.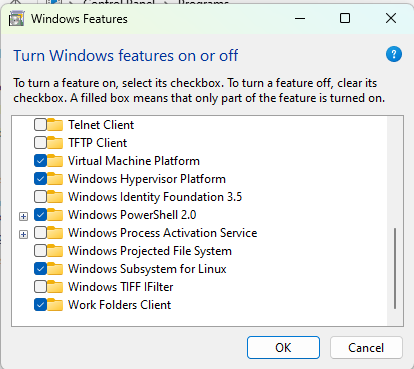
-
When prompted, restart your computer.
-
Install Android Studio. Check the log at the end of the installation process to ensure everything works correctly.
Enable Virtualization in BIOS
I didn’t need to try this step since the previous fix worked for me, but I’m leaving it here as an additional option.
- Completely shutdown you Computer.
- Turn it back on and immediately start pressing the key to access the BIOS settings (usually it is
Del,F1,F2,F4,F11, orF12). - In the BIOS, find the CPU configuration (it could be under "Advanced Mode" or "Chipset").
- Look for a setting related to Virtualization and enable it. It could be named Hyper-V, Vanderpool, SVM, AMD-V, Intel Virtualization Technology, or VT-X.
- Save and reboot your computer.
Check If Virtualization Is Enabled
- Open PowerShell with administrator rights.
- Run the following command:
systeminfo | Select-String "Hyper-V"
or
systeminfo | Select-String "Hyper-V Requirements"
If it says "Hyper-V is detected", you're all set!
Conclusion
This issue had me stuck for two days! Since there wasn't much information online, I hope this blog helps anyone facing a similar problem. I’ve outlined only the most gamechanging parts of my debugging process in case none of the listed solutions work for you, and you might get an idea from my approach.
Remember: Patience is key, and don’t give up!